Design Help
How do I customize the color of my slides?
Currently we only offer black soles, however you can choose any color you like for the straps of your slides.
To get started, go to our customizer page. Once the page has loaded, click the “Strap Style” button:

From here, you can choose a solid color for your straps or select one of our popular preset background designs. To select a solid color, click on the square that previews your current background color shown below:

Once you click on the current background color circled above, a new drop down will appear with a full spectrum color selector. First, click in the color range you are looking for at the bottom and then click inside the color box to select your actual color as shown below:

How do I select a preset background design?
Our preset strap designs are organized by category. To apply one of these designs, click the category dropdown menu then select the category that you’re interested in:


Once you’ve done that, scroll through the available preset designs until you’ve found one you like. Click it to apply:

How do I add Text to my custom design?
From our customizer page, you can click on the “Text” button shown below:

When you click the “Text” button, the text editing options will appear from the drop down menu. A text box will also automatically appear on your design that will read “Your text here…”.
Next, you will want to delete “Your text here…” and add the text that you want on your design. There are two ways to do this shown below:

Once you’ve written your custom text, you can then select the font, color, size, and outline color/width from the editing menu.

Next, you can adjust the location, alignment, and size of the text directly on the design preview. It’s important to note that you must click on the text in order to select it. Once it is selected your editing options will appear as shown below:

Pro tip: If you’d like to add personalized text on the sides of the slides use the rotate buttons to make sure your text is aligned properly
How do I upload my logo or an image file?In order to upload your logo or image file, click “Images” on the customizer tool shown below:

When you click on “Images” shown above, it will prompt you to upload a file from your computer. You can only upload .jpg or .png files and the size of the file must be below 10MB. Once you select your image file from your computer it will show up on the design preview. Once your image is uploaded, you can make edits to the image by using the options shown below:

You can remove white from your image or logo by clicking the box labeled “remove white” shown above. You can create a tiled or pattern feature with your image or logo by clicking the arrow next to “Tile/Pattern”. When you click “Tile/Pattern” the customizer will automatically pattern your design a certain way. You can make adjustments to the pattern by changing the settings that will appear when you click on “Tile/Pattern” shown below:

How do I match colors in the customizer tool?
For any option where you select a color (background, text, or outline), you can match the color to something else in your design. When you go to select a solid color for either the background, text, or outline, you will be able to click the red button from the drop down options that says “Match Color”:

When you click “Match Color”, you will be prompted to select the color you want by clicking on something in design with that color.
How do I make a different design for the left/right slide?
If you’d like to have a different design for the left/right foot, you need to unlock the option to make different designs by foot. If you do not unlock the left/right strap it is assumed you want the same exact design on both feet. There is a lock button at the bottom of the design page where you can unlock the left/right design show below:

To unlock the right/left functionality, click the lock button shown above. You can then click on right/left to change the designs by each foot. Be careful while using this function and always preview your design to make sure it looks how you want it to.
How do I preview my design?
In order to see a 3D mockup of the design you’ve created, click the “3D Preview” button on the design page shown below:

Clicking the 3D preview button will take you to a new page where you can preview your design on a 3D mockup of our slides. From this page, you can continue editing, save your design, and/or select sizes to add to your cart.
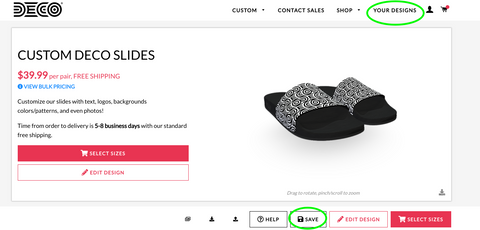
How do I save a design to access at a later point?
In order to save a design, you click on the “Save” button at the bottom of the design page. Keep in mind you will need to have an account with us to save designs. If you do not have an account, the site will prompt you to create one when you click on “Save”. If you do have an account, it may prompt you to log in before you can save the design. Once saved, you can click on “Your Designs” shown below to access your design to continue editing and/or “Select Sizes” to add to your cart.